Shrimp Corn Cakes – Gluten-Free

Shrimp and corn pair perfectly in this scrumptious fried delectable. I just made them for New Year’s dinner. You can make just a few at a time, but I make 3 dozen and then freeze them in packages for future dinners. Dip them in any sauce that you like from hot and spicy to my homemade cocktail sauce.

Preparation Time: 30 minutes

Cooking Time: 6 minutes per cake/batch (3 dozen is 4 or 5 batches depending on the size of your pan = 24ish minutes)

Overall Time:: 54 to 60 minutes

Servings: 3 dozen

Ingredients

2 cups ONION, chopped (1 medium)
6 cloves GARLIC, minced 
2 lbs SHRIMP, peeled and deveined, finely chopped (I mush in food processor)
OIL for frying (amount will depend on pan and how many cakes in each)
3 cups GLUTEN-FREE ALL PURPOSE FLOUR (with Xanthan Gum)
1 cup GLUTEN-FREE CORN MEAL
4 tablespoons CORN STARCH
4 teaspoons BAKING POWDER
1 teaspoon SALT
1 teaspoon BLACK PEPPER
1 can (15 oz) CREAMED-STYLE CORN
1 can (15 oz) WHOLE KERNEL CORN
4 large EGGS, beaten
Sides:
   Quinoa (15-20 minutes on stovetop)
   Frozen or fresh seasonal vegetables (6-7 minutes)
   Cocktail sauce or any sauce of your choice for fried fish.

Directions

  • PREPARE SHRIMP
    • If using frozen shrimp, you can quickly DEFROST them by placing the amount of shrimp you want in a colander. Place the colander in a large bowl and run it under cold water until the water covers the shrimp. Let the shrimp sit in the cold water for about 10 minutes. PULL the shrimp out of the water and RINSE with fresh water. DRAIN and PAT DRY.
    • If you use shell-on shrimp, remove the shells or purchase already shelled shrimp.
    • DEVEIN the shrimp if not already cleaned.
    • CHOP SHRIMP finely or pulse in the food processor until a chunky mush.
    • Set aside
  • PREPARE QUINOA or RICE per package directions (15-20 minutes) at the appropriate time.
  • PREPARE VEGETABLES per package directions (~8 minutes) at the appropriate time.
  • PREPARE 1 or 2 cookie sheets with paper towels to drain cakes when they come out of frying.
  • HEAT 1-1/2 tablespoons of oil in a large skillet (cast iron or heavy pans work best) over medium-high heat
  • COOK onions until tender.
  • ADD garlic and COOK for 1 more minute
  • ADD the shrimp to the skillet, spreading the shrimp out evenly in the pan and keep TURNING until the shrimp turns a nice pink.
  • REMOVE from heat and set aside.
  • In a large bowl (big enough to handle everything), MIX the dry ingredients: flour, cornmeal, cornstarch, baking powder, salt and pepper.
  • In another bowl, MIX the wet ingredients: corn, eggs, and shrimp mixture.
  • STIR the wet ingredients into the dry just enough to get everything moistened.
  • WIPE the skillet with a paper towel so that you can reuse it.
  • HEAT 1/4 inch of oil to 375 degrees (the way I know it is hot enough is I drop a small bit of batter into the oil and if it sizzles but does not splatter, it is good).
  • In batches (depending on the size of your skillet), DROP* 1 heaping tablespoon of the mixture into the skillet and fry until golden brown (2 to 3 minutes per side – then flip). I use 2 spatulas to flip.
    • * I love my 1 tablespoon ice cream scooper, which makes life easier. Once the cake is in pan, I flatten it with the back of a spatula.
  • PLACE finished cakes on prepared paper towels to DRAIN.
  • SERVE with quinoa or rice with a side of seasonal vegetables and my homemade cocktail sauce.
  • STORE in the refrigerator in an air-tight container for 2 days. FREEZE for 3 months.

Inspired by TasteofHome.com Shrimp Corn Cakes with Soy Mayo

Cinnamon Coffee Cake Muffins Gluten-Free Dairy-Free

I love the smell of cinnamon in the kitchen. I wanted to make a quick and easy recipe for a breakfast muffin to go with coffee. And, I wanted it to give me that cinnamon filling and crumbly top of a coffee cake. I like the ease of muffins in the morning (or really any time). This recipe can be made vegan, if you use an egg replacer.

Preparation Time: 15 minutes

Cooking Time: 25 minutes

Servings: 24

Ingredients

FILLING
1 cup LIGHT BROWN SUGAR - PACKED (For a sugar-free recipe use coconut sugar instead)
1 Tbsp GROUND CINNAMON

TOPPING
1 cup LIGHT BROWN SUGAR - PACKED (For a sugar-free recipe use coconut sugar instead)
1 cup GLUTEN-FREE ALL PURPOSE FLOUR (with Xanthan Gum) - I used Bob's Red Mill 1-1
1 Tbsp GROUND CINNAMON
1/2 cup VEGAN BUTTER - softened and chopped up

MUFFIN BATTER
3 cups GLUTEN-FREE ALL PURPOSE FLOUR (with Xanthan Gum)
2 tsp BAKING POWDER
1/4 cup LIGHT BROWN SUGAR - PACKED (For a sugar-free recipe use coconut sugar instead)
3/4 cup GRANULATED SUGAR (For a sugar-free recipe use coconut sugar instead)
1 tsp GROUND CINNAMON
1/2 tsp SALT
1 cup VEGAN BUTTER - melted
1 tsp VANILLA EXTRACT
3 EGGS, at room temperature (To make VEGAN - use egg replacer like FLAX eggs)
3/4 cup unsweetened NON-DAIRY MILK (I used Cashew Milk)

Directions

  • PRE-HEAT oven to 350 degrees F
  • Prepare 24 standard muffin tins with paper liners
  • FILLING: In a small bowl, WHISK all the filling ingredients until there are no brown sugar lumps. Set aside.
  • TOPPING: In a medium bowl, COMBINE all the topping ingredients and mix until it forms small crumbles. If you have a pastry blade that might help.
  • REFRIGERATE the topping until later
  • BATTER: In a large bowl, MIX together the flour, baking powder, light brown sugar, granulated sugar, cinnamon, and salt.
  • ADD the melted butter and vanilla, and using a hand mixer on low, completely combined with the dry ingredients.
  • BEAT in the eggs and mix until smooth.
  • POUR the milk in, about a 1/4 cup at a time, and BEAT until smooth. Set aside.
  • ASSEMBLE: FILL muffin cups about 1/4 full with batter.
  • SPRINKLE the filling on top of the batter in each muffin cup; cover from side to side.
  • FILL muffin cups with the rest of the batter (about 1/2 full – do not overfill)
  • SPRINKLE topping evenly over muffins in each cup and pat down so that it covers nicely
  • BAKE: 20-25 minutes or until a toothpick comes out clean from the center of the muffins
  • COOL in the pans for 10 minutes before serving or moving muffins to a cooling rack
  • STORE in an air-tight container for a few days or freeze for up to 3 months. Thaw in the refrigerator and heat in the microwave for 10-15 seconds. These muffins are awesome when warm – I have been spreading vegan cream cheese on top.

APPLE CRISP Vegan & Gluten-Free

Because my spouse does not like pies, but really likes the crumble and the gooey stuff inside my apple pie, I came up with this sweet and scrumptious apple crisp. If the inners and the top are your things, then this crisp, with a dollop of vegan vanilla ice cream is the perfect end to your Thanksgiving meal.

Preparation Time: 15 minutes

Cooking Time: 30-35 minutes

Servings: 6 to 8

Ingredients

TOPPING
1/2 cup GLUTEN-FREE ALL PURPOSE FLOUR (I use King Arthur)
(I use all purpose flours with Xanthan Gum already in the mix.
If you don't then you will need to add it. When adding 
xanthan (zan-than) gum to a recipe, use about 1/4 teaspoon
per cup of flour. Blend it evenly into your dry ingredients before mixing.)
1/2 cup GLUTEN-FREE ROLLED OATS 
1/2 cup LIGHT BROWN SUGAR - PACKED (For a sugar-free recipe use coconut sugar instead)
1/2 tsp BAKING POWDER
1/4 tsp GROUND CINNAMON
1/8 tsp SALT
5 Tbsp VEGAN BUTTER - softened and chopped up

FILLING
4 GRANNY SMITH APPLES (5 cups)- peeled & chopped into small cubes
3 Tbsp VEGAN BUTTER - melted
2 Tbsp GLUTEN-FREE ALL PURPOSE FLOUR (with Xanthan Gum)
1 Tbsp LEMON JUICE
3 Tbsp CASHEW MILK (or any nut-milk)
1 tsp VANILLA EXTRACT
1/4 cup LIGHT BROWN SUGAR - packed
1/2 tsp GROUND CINNAMON
1/2 tsp GROUND NUTMEG
1/8 tsp SALT

Directions

  • PRE-HEAT oven to 375 degrees F
  • COAT 8X8 baking dish with cooking spray
  • In a medium bowl, COMBINE all the topping ingredients and mix until it forms small crumbles. If you have a pastry blade that might help.
  • REFRIGERATE the topping until later
  • In a large bowl, ADD the chopped apples
  • ADD the butter, flour, lemon juice, milk, vanilla, brown sugar, and spices and stir until completely combined
  • TRANSFER the apple mixture into the greased baking dish and spread evenly
  • SPRINKLE topping evenly over apples and pat down so that it covers nicely
  • BAKE for 30-35 minutes or until the top is golden brown.
  • COOL in the pans for 5-10 minutes before serving
  • STORE in an air-tight container in the refrigerator for up to 3 days. This crisp freezes well for up to 3 months. Thaw in the refrigerator and reheat in over on 350 for 20 minutes.

Adapted from http://www.mamaknowsglutenfree.com

Yummy Chicken Pot Pie and Pie Crust Gluten-free Dairy-free

I was yearning for a gluten-free chicken pot pie that had more stuff in it than just 4 cubes of chicken and a few peas and carrots, and especially with a crust that wasn’t just placed on top and fell right off. I realized that I had to make my own from scratch since nothing like that was available commercially. WOW! was I surprised at how yummy it came out. Not only is the crust flaky but the filling is full of white meat chicken, carrots, peas, onion, and gravy that is flavorful and filling. You can shorten the preparation time by using a store-bought gluten-free crust if you can find one.

Preparation Time: 40 minutes (20 Crust, 20 Filling)

Cooking Time: 40 minutes

Total Time: 1 hour 20 minutes

Cooling Time: 15 minutes (the more time the better)

Servings: 12 slices

Ingredients

CRUST
(makes 2-10" crusts for top and bottom)
3 cups GLUTEN-FREE ALL-PURPOSE BAKING FLOUR with Xanthan gum included
1/2 teaspoon SALT (or more to taste)
1 cup (2 sticks) VEGAN BUTTER (I use EARTH BALANCE) - cold
1/2 cup DAIRY-FREE MILK ALTERNATIVE (I use CASHEW MILK) - cold

FILLING
2 fresh skinless, boneless CHICKEN BREASTS - cubed
  (omit chicken and substitute spinach to make it vegetarian)
1 can SLICED CARROTS (or 1 cup fresh or frozen)
1 can GREEN PEAS (or 1 cup fresh or frozen)
1/3 cup VEGAN BUTTER
1/3 cup YELLOW ONION, chopped
1/3 cup GLUTEN-FREE ALL-PURPOSE BAKING FLOUR
1/2 teaspoon SALT
1/4 teaspoon BLACK PEPPER
1/2 teaspoon GARLIC POWDER
1/2 teaspoon DRIED THYME
4 cups (32 oz) CHICKEN BROTH/STOCK (or use Vegan Stock)
2/3 cup DAIRY-FREE MILK ALTERNATIVE (Cashew)

Directions

  • PRE-HEAT oven to 425 degrees F
  • SPRAY PIE PAN with non-stick spray or shorting
  • CRUST INSTRUCTIONS
    • In a medium bowl, COMBINE Gluten-Free All-Purpose Flour with Xanthan gum and salt together
    • CUT cold vegan butter into the flour mixture (I use a knife and fork because I don’t have a pastry knife). The butter should be about the size of peas.
    • ADD dairy-free milk, a little at a time, to moisten the mixture.
    • Using your hands WORK the milk into the flour until a good dough is formed. Add more milk if needed.
    • SEPARATE dough into 2 balls
    • ROLL 1 ball between 2 pieces of lightly dusted wax paper with a rolling pin (or on a gluten-free floured dough board) until you have a circle at least 10′ in diameter (match your pie pan size).
    • Remove the top piece of wax paper and FLIP the dough into the bottom of the pie pan. Remove the bottom piece of wax paper and gently press the dough into the bottom of the pan making sure to close any cracks in the dough by gently rubbing with your fingers.
    • TRIM edges if needed
    • ROLL 2d ball between 2 pieces of wax paper like you did the 1st one
    • Set 2d crust aside until you are ready for it
  • FILLING INSTRUCTIONS
    • In a medium saucepan, COMBINE chicken, carrots, and peas. ADD 4 cups of broth/stock to cover and BOIL for 15 minutes. REMOVE from heat, DRAIN but SAVE stock to be used later, and set aside
    • In a medium saucepan (the same or new) over medium heat, MELT butter and COOK onions until soft and translucent.
    • STIR in flour, salt, pepper, thyme, garlic powder.
    • SLOWLY STIR in 1-3/4 cup of saved stock and dairy-free milk.
    • SIMMER over medium-low heat until thick. STIR frequently.
    • REMOVE from heat and set aside.
  • PIE CONSTRUCTION INSTRUCTIONS
    • PLACE the CHICKEN MIXTURE in the bottom pie crust, filling about 1/2 way
    • POUR GRAVY MIXTURE over top of chicken mixture, filling about 3/4 way
    • COVER the pie with the 2d crust and SEAL the edges using a fork around the whole rim, trimming any excess that hangs over the sides.
    • PRICK the top of the crust with a fork in many places, or cut a few slits, to let the steam escape.
    • BAKE on a BAKING SHEET on BOTTOM RACK for 35-40 minutes or until the top is golden brown.
    • COOL for at least 15 minutes to allow the filling to set
  • STORE in the refrigerator for up to 4 days.

Inspired by a bunch of good recipes: https://www.glutenfreepalate.com/ and https://www.allrecipes.com/recipe/26317/chicken-pot-pie-ix/

Let me know if you made it and what you think.

Thanks for visiting Lorians Kitchen

Easy Banana Bread Gluten-free Dairy-free

It’s OK if you don’t want to believe me, but this is the best Banana Bread you will ever eat and it is also gluten and dairy free. Once you make it you will absolutely agree. I made this batch with dairy-free chocolate chips and topped it with walnuts but I have also made it with raisans, flax seed, and almonds. Let me know how yours turns out and what options you put in.

Preparation Time: 15 minutes

Cooking Time: 45-50 minutes

Servings: 12 slices (2 loaves)

Ingredients

4 large EGGS
4-5 very ripe BANANAS, mashed
1 cup SUGAR
4 ounces natural APPLESAUCE
1/3 cup high quality VEGETABLE OIL
1 teaspoon VANILLA
2 cups GLUTEN-FREE ALL-PURPOSE BAKING FLOUR
1 teaspoon BAKING SODA
1/4 teaspoon SALT
OPTION Pairings:
1/2 cup DAIRY-FREE CHOCOLATE CHIPS
1/2 cup WALNUTS, chopped/smashed
or
1/2 cup RAISINS
1/2 cup FLAX SEED
1/2 cup ALMONDS, chopped


Directions

  • PRE-HEAT oven to 350 degrees F
  • COAT two 9X5 loaf pans with cooking spray
  • In a large bowl, BEAT the eggs and add the bananas and MASH together (or you can mash the bananas before this step, but I don’t like to dirty too many bowls)
  • ADD the sugar, oil, vanilla, and applesauce and mix together well
  • In medium bowl, BLEND together the flour, salt, and baking soda
  • ADD the dry ingredients into the banana mash and with a big spoon or spatula MIX until all the dry ingredients are combined. Banana lump are fine, don’t over mix.
  • FOLD IN any mix-ins at this point
  • TRANSFER the batter into the loaf pans and SPRINKLE the top of each loaf with the nuts
  • BAKE for 45-50 minutes or until a toothpick in the center of the loaf comes out clean
  • COOL in the pans for 10 minutes and then REMOVE from pans and cool on a wire rack for another 20 minutes
  • NOTE: Try peeling your bananas from the bottom up, instead of the stem down, for easy, no mess peeling, especially when over ripe.
  • STORE in an air-tight container on the counter for up to 2 days, then refrigerate. This bread freezes well for up to 6 months. Slice it frozen and toast it in the toaster oven.

Easy Salmon & Asparagus in Foil

Quick and easy foil packets of salmon and asparagus baked in the oven make this dairy-free / gluten-free high protein dinner something to look forward to on a busy night. Thaw frozen fillets in the refrigerator during the day so they are ready to cook when you get home from work.

Preparation Time: 5 minutes

Cooking Time: 14-17 minutes

Servings: 2

Ingredients

2 SALMON fillets
1/2 teaspoon ROASTED GARLIC POWDER
1/2 teaspoon PAPRIKA
1/2 teaspoon ground BLACK PEPPER
1/2 teaspoon KOSHER SALT
1/2 pound ASPARAGUS SPEARS, trim the ends off
1/2 cup VEGAN BUTTER, melted (EARTH BALANCE Non-soy sticks)
3 tablespoons LEMON JUICE
1/2 tablespoon GARLIC, minced
1 teaspoon BASIL

Directions

  • PREHEAT the oven to 400 degrees F
  • PREPARE 2 sheets of heavy-duty aluminum foil (about 12X18″)
  • CUT the ends off the asparagus and divide the bunch in 2
  • In a small bowl, MIX garlic powder, paprika, salt and pepper
  • SPRINKLE 1/2 the dry mixture on one side of the salmon fillets and RUB gently totally covering the fillets
  • FLIP the salmon fillets and SPRINKLE the other 1/2 of the dry mixture and RUB gently to ensure fillets are well seasoned
  • PLACE each salmon fillet in the center of a foil sheet
  • PLACE 1 asparagus bunch next to each fillet on the foil
  • In a small bowl, MIX the melted butter, lemon juice, minced garlic and basil
  • Turn the edges up on the foil packets a little bit so that the butter doesn’t overflow and POUR the butter mixture over everything
  • SEAL the foil packets:
    • With the fillet and asparagus in the center of the foil sheet, BRING the long sides together in the center
    • CREASE the pieces together and tightly fold in a downward motion, continuing to create folds until the foil lies flat against the packet’s top
    • FOLD the shorter sides inward in a similar fashion. You don’t want the steam or juices to escape.
  • BAKE in the oven for 12-14 minutes
  • Carefully OPEN the tops of the foil packets and BROIL for 2 more minutes
  • SERVE with an additional side of rice if so desired
  • STORE in the refrigerator in an air-tight container for 1-2 days

Asparagus Salmon Foil Packet dinner inspired by www.eazypeaszymeals.com

Foil Packet instructions inspired by https://www.tasteofhome.com/article/how-to-cook-in-foil-packets/

Gluten-Free Maple Dijon Shrimp

Shrimp is my quick and easy dinner protein, especially because I can use frozen, peeled and deveined shrimp in only 10 minutes. This sauce is sweet and tangy and sticks perfectly to the shrimp, making it just right for licking your fingers. I buy a 2 lb bag of frozen large shrimp when I find it on sale so that I always have some on hand. If you have time, make the sauce about 30 minutes before and let the shrimp marinate in the refrigerator allowing for a more robust flavor. I served the shrimp over vegetable infused quinoa with steamed seasonal vegetables.

Preparation Time: 12 minutes

Cooking Time: 6-8 minutes

Servings: 4

Ingredients

1 lb of SHRIMP, peeled and deveined (I like tail-on)
1/2 cup MAPLE SYRUP
2 tablespoons of LEMON JUICE
2 tablespoons of GLUTEN FREE SOY SAUCE
2 teaspoons DIJON MUSTARD
1 teaspoons GINGERROOT, minced
1 tablespoons of extra virgin OLIVE OIL
Dried PARSLEY
Sides:
Stovetop Quinoa (15-20 minutes)
Frozen seasonal vegetables (6-7 minutes)

Directions

  • PREPARE SHRIMP
    • If using frozen shrimp, you can quickly DEFROST them by placing the amount of shrimp you want to cook in a colander. Place the colander in a large bowl and run it under cold water until water covers the shrimp. Let the shrimp sit in the cold water for about 10 minutes. PULL the shrimp out of the water and RINSE with fresh water. DRAIN and PAT DRY before adding to marinade.
    • If you use shell on shrimp, which adds more flavor to the dish, it can get messy to eat. I prefer to remove the shells prior to cooking or purchase already shelled shrimp. But I do leave the tails on. It’s a personal choice.
    • DEVEIN the shrimp before cooking if you are taking the shell off
  • PREPARE QUINOA or RICE per package directions (15-20 minutes)
  • PREPARE MARINADE
    • In a large bowl (big enough for the shrimp), WHISK together maple syrup, lemon juice, gingerroot, gluten-free soy sauce, and mustard
    • ADD the thawed shrimp and MIX well to cover
    • If you have the time, REFRIGERATE for 30 minutes
  • PREPARE VEGETABLES per package directions (~8 minutes)
  • HEAT olive oil in a large skillet over medium-high heat
  • ADD the marinated shrimp to the skillet, spreading the shrimp out evenly in the pan and add some leftover marinade as well to heat as additional sauce
  • COOK the shrimp for 2 minutes and then TURN them over and cook another 2 minutes (this is mostly to heat them if using precooked shrimp). COOK 3-4 minutes a side if using uncooked shrimp, until they turn a nice pink.
  • REMOVE from heat and SPRINKLE with dried parsley
  • SERVE over quinoa or rice with a side of seasonal vegetables, using extra sauce if you like
  • STORE in the refrigerator in an air-tight container for 2 days

Chocolate Toffee Matzo Bark for Passover Gluten-free Vegan

Being dairy-free, I love when Passover comes around because the desserts are among my favorites. I created this gluten-free vegan Matzo Bark as an alternative to all the cakes and macaroons that I make this time of year. If you want to make it Kosher for Passover, then make sure to get Shmurah matzo. You can top this with any type of nut or even cherries or cranberries. Let me know what you think.

Preparation Time: 20 minutes

Cooking Time: 1 hour

Servings: 12-16

Ingredients

5-6 gluten-free SALTED MATZO-Style boards 
If making for Passover use Shmurah matzo
1 cup DARK BROWN SUGAR, packed
1 stick VEGAN BUTTER (Soy-free Earth Balance)
2 cups VEGAN CHOCOLATE CHIPS (Enjoy Life)
1/2 teaspoon pure VANILLA
Pinch of SEA SALT
1/2 cup SALTED PEANUTS, smashed/finely chopped
1/2 cup ROASTED ALMONDS, chopped
Non-stick COOKING SPRAY
PARCHMENT paper

Directions

  • PREHEAT oven to 350 degrees F
  • LINE rimmed baking dish with parchment and SPRAY with non-stick spray
  • COVER the bottom of the baking dish with a single layer of matzo. Break the pieces if you need to make them fit.
  • In a saucepan over medium heat, COMBINE sugar and butter, STIR frequently until it bubbles and boils. Be careful not to burn the syrup. BOIL for 1-minute stirring constantly.
  • ADD a big pinch of salt and the vanilla to the syrup
  • POUR the syrup over the matzo and SPREAD evenly with a heat-proof spatula
  • BAKE 7-10 minutes until toffee syrup is bubbling. Make sure to check frequently so that it does not burn.
  • REMOVE from the oven and immediately SPRINKLE the chocolate chips over the toffee and let it MELT for 1-3 minute from the heat of the syrup
  • SPREAD the melted chocolate chips evenly with a heat-proof spatula
  • SPRINKLE the nuts over the chocolate and PRESS gently so that they stick well
  • REFRIGERATE the sheet for 30 minutes to 1 hour until hard
  • BREAK the matzo boards into pieces and store in an air-tight container until ready to serve
  • STORE in the refrigerator for up to 5 days

Vegan Savory Sweet Potato Mash

Here’s a savory vegan alternative to the usual sweet sweet potato side dish that you find at many holiday meals. This 30-minute mash is vegan, vegetarian, gluten-free, dairy-free and generally allergy free but it is well spiced and creamy, with coconut milk, vegan butter, nutmeg, cinnamon, and sage. Give it a try next time you are planning on serving potatoes.

Preparation Time: 10 minutes

Cooking Time: 20 minutes

Servings: 4

Ingredients

2 large SWEET POTATOES
4 tablespoons Vegan BUTTER, melted
1/2 cup COCONUT MILK, warmed
1/2 teaspoon CINNAMON
1/2 teaspoon SAGE
1/4 teaspoon NUTMEG
1/4 cup BROWN SUGAR
SALT and PEPPER to taste
Sprinkle of PARSLEY

Directions

  • SCRUB, PEEL, and CUT potatoes into big even sized chunks. Chunks of similar size will cook at a more consistent rate.
  • PLACE potatoes in a medium pot and cover with COLD water enough to cover potatoes by about 1 or 2 inches
  • ADD a pinch of salt and bring to a BOIL
  • When the water is boiling, REDUCE heat to a SIMMER for 15 minutes until potatoes are fork tender (soft)
  • While the potatoes are cooking, in a medium saucepan on medium heat, MELT the butter
  • ADD sage and saute
  • WARM the coconut milk
  • DRAIN the potatoes in a calendar and then RETURN to the still warm potato pot
  • ADD the sage, butter, milk, spices and brown sugar mixture to the potato pot
  • MASH gently. I like to leave my potatoes chunky. Don’t over mash or the potatoes can become pasty.
  • ADD salt and pepper to taste

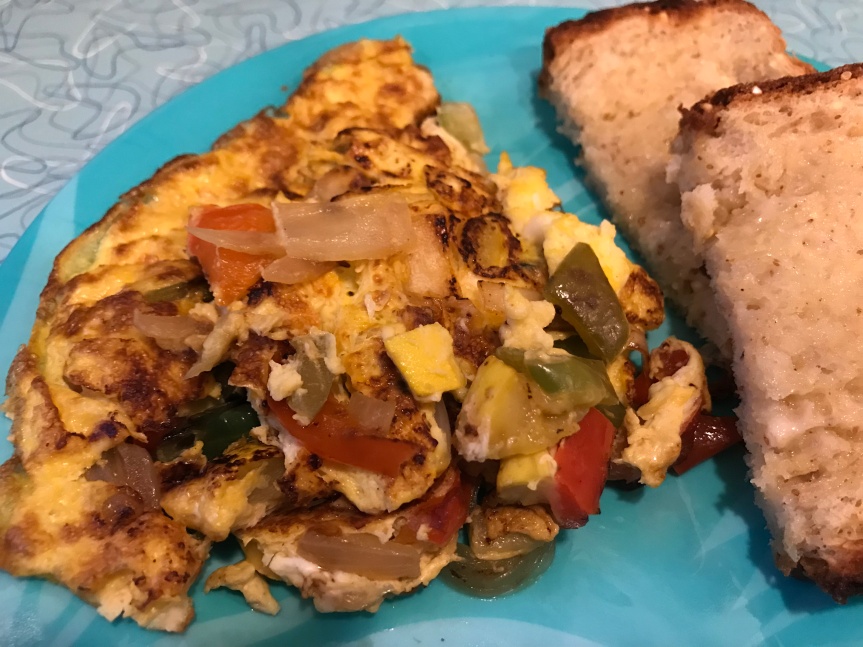
Yesterday’s Leftovers Omelet

When there is just a little bit of veggies and rice left over from the night before or you have some fajitas from a Mexican dinner in the refrigerator that you just don’t want to go to waste, the solution is this easy omelet that is great for breakfast or dinner. Basically, you can mix almost anything with a couple of eggs and have a tasty meal in less than 15 minutes.

Preparation Time: 5 minutes

Cooking Time: 10 minutes

Servings: 2

Ingredients

Any combination of veggies and starches can work. 
May I suggest:
1/2 ONION, chopped
1 cup MUSHROOMS, sliced
1 BELL PEPPER, chopped
1 small bowl leftover cooked RICE, warmed or
chopped up boiled or roasted POTATOES
2 or 3 small TOMATOES
4 EGGS, beaten
Splash of DAIRY-FREE MILK ALTERNATIVE, I like cashew milk
1 teaspoon DAIRY-FREE BUTTER
SALT & PEPPER to taste
Handful of VEGAN CHEDDAR CHEESE, shredded

Directions

  • Depending on what leftovers you are using, you may or may not need to CHOP them up a little finer before frying
  • In a medium skillet, with a metal handle so that it can go in the oven, over medium-high heat, MELT the butter
  • FRY the vegetable leftovers together
  • WARM rice in a microwave if using
  • ADD rice or potatoes, salt and pepper to taste
  • If you are adding fish (or even meat) now would be the time to mix it in. COOK all ingredients until you feel they are well heated
  • BEAT eggs with a splash of dairy-free milk in a small bowl
  • POUR beaten egg mixture over the leftovers covering all ingredients. Depending on how much leftovers you use, you may need to add another egg or even 2.
  • COOK until the bottom of omelet is golden but the top is still uncooked
  • REMOVE the skillet from stove
  • ADD a handful of cheese shreds and place skillet under the oven BROILER until the top is golden brown and the eggs appear set (cooked through)
  • CUT the omelet in half or quarters, depending on size
  • SERVE with gluten-free toast and fresh fruit for breakfast or try a nice salad for dinner
  • STORE in an airtight container in the refrigerator for 2 days (would you call these leftover leftovers?)

30-Minute Zucchini Patties – Dairy-Free & Gluten-Free

There are many healthy reasons to eat zucchini: it’s a good source of fiber, calcium, minerals, and vitamins. But let’s face it, I love these 30-minute vegetable patties just because they taste amazing. Dairy-free cheese makes them moist and red pepper flakes give them a little kick. Dip them in some marinara sauce and serve with more veggies and rice. You can make 16 cakes if you want them for appetizers, but I make 8 big ones and have 2 for dinner.

Preparation Time: 15 minutes

Cooking Time: 6-12 minutes (6 minutes a cake)

Servings: 8 cakes

Ingredients

2 medium ZUCCHINI (3 cups)
3 EGGS, beaten
1 small ONION, chopped
3 cloves GARLIC, chopped
3/4 cup gluten-free ITALIAN BREAD CRUMBS
1/4 cup gluten-free ALL PURPOSE FLOUR (or gf baking mix)
1/4 cup dairy-free PEPPERJACK CHEESE
1/2 cup dairy-free CHEDDER CHEESE
1/2 teaspoon KOSHER SALT
1/2 teaspoon RED PEPPER FLAKES
2 tablespoons VEGETABLE OIL

Directions

  • PREPARE zucchini
    • SHRED 3 cups of zucchini. I use a food processor which makes it quick and easy.
    • SALT zucchini and place in a colander for 10 minutes
    • PRESS down on the zucchini with paper towels to express all the excess liquid into the sink. Getting out as much moisture as you can will improve the texture of the patty.
    • PAT dry with a paper towel
  • In a medium bowl, BEAT the eggs
  • ADD the onion, garlic, gluten-free flour, dairy-free cheeses, red pepper flakes, and salt to taste. MIX well.
  • STIR zucchini into the mixture and mix well
  • PLACE bread crumbs in a flat bottom baking dish
  • Wet your hands slightly and fORM the zucchini mixture into patties
  • ROLL the patty into the bread crumbs, making sure to coat each side fully
  • In a large skillet, HEAT the oil over medium-high heat
  • Place the patties into the skillet and COOK for 3 to 4 minutes per side, until golden brown
  • REMOVE patties from skillet and DRAIN/BLOT on a plate covered with a paper towel
  • SERVE with marinara sauce for dipping
  • STORE in foil in the refrigerator for 4-5 days. FREEZE for 90 days.

Inspired by Allrecipes.com Zucchini Patties

Instant Pot Great Northern Bean Chicken Soup

The Polar Vortex has brought unprecedented cold weather. They say it hasn’t been this cold in a generation. Cold Weather = Hot Soup. I quickly sauteed some chicken and pressure cooked it with Great Northern White beans, onion, garlic, carrots, green and red peppers, and spices to make this dairy-free and gluten-free tummy warmer in less than an hour. Stay warm.

Preparation Time: 15 minutes

Cooking Time: 20 minutes (plus preheating and cooling of Instant Pot)

Servings: 8

Ingredients

1-1/2 tablespoons OLIVE OIL
3 skinless boneless CHICKEN BREAST (2 lbs)
2 YELLOW ONIONS, diced
1 tablespoon (3 cloves) GARLIC, minced
6 cups reduced-sodium CHICKEN BROTH
4 large CARROTS, peeled and cut into 1/2 inch slices
1/2 GREEN BELL PEPPER, diced
1/2 RED BELL PEPPER, diced
1 30-ounze can GREAT NORTHERN WHITE BEANS, drained & rinsed
2 BAY LEAF
1 teaspoon dried ROSEMARY
1/2 teaspoon dried THYME
1/4 teaspoon SMOKED PAPRIKA
1 teaspoon SALT
1/2 teaspoon ground BLACK PEPPER
Optional Toppings: Gluten-Free TORTILLA CHIPS

Directions

  • PREPARE CHICKEN
    • Turn Instant Pot on to SAUTE normal setting
    • When pot display says ‘HOT,’ ADD the oil and SWIRL it around to coat the bottom of the pot
    • ADD chicken breasts and SAUTE the chicken, about 3 minutes each side, until browned (6 minutes total)
    • REMOVE chicken from pot and set aside
  • PREPARE SOUP
    • With Instant Pot still on SAUTE normal setting, ADD the onions and cook for 3 minutes, until translucent
    • ADD the garlic and SAUTE another 30 seconds, stir frequently
    • ADD carrots, green pepper, red pepper, bay leaf, rosemary, thyme, smoked paprika, salt, and pepper and mix well
    • STIR in the broth and SCRAPE pot to mix well
    • STIR in beans and mix well
    • RETURN the chicken to the pot and submerge in broth mixture
  • COOK SOUP
    • CLOSE the pot lid tightly
    • SET pressure release valve to ‘SEALING’
    • SET manual pressure cook button to high pressure for 10 minutes
    • The Instant Pot will reach desired pressure within 10-15 minutes and then it will begin to count down the set amount of time
    • When the timer finishes counting down the 10 minutes, PRESS ‘CANCEL,’ and carefully MOVE the release value to ‘VENTING.’ Allow a natural pressure release for 5 to 10 minutes, and then you can quick pressure release the rest. Use tremendous caution when working with steam and when venting your Instant Pot.
    • REMOVE the lid once the pot pressure is released and using tongs REMOVE chicken from the pot and place in a bowl
    • SHRED chicken by holding each piece with a fork or the tongs and pulling it apart with another fork. Chicken should be well cooked and shred easily.
    • RETURN shredded chicken to the pot and STIR
    • SEASON soup with additional salt and pepper to taste
  • SERVE in bowls topped with gluten-free tortilla chips
  • STORE in the refrigerator for 2-3 days in an airtight container

Inspired by Instant Pot Chicken and White Bean Soup by 365daysofcrockpot.com

Paleo Almond Coconut Bread

I missed having a thick slice of homemade bread, like I used to before I was gluten-free, to go along with my warm bowl of butternut squash soup. So, I created this delicious gluten-free, dairy-free, paleo bread that brings together the nutty flavors of almond and coconut with just a hint of cinnamon spice and maple. The bread is so moist that you don’t even need additional spreads.

Preparation time: 10 minutes

Cooking time: 30-35 minutes

Servings: 8 to 12 slices

Ingredients

1-1/3 cups ALMOND FLOUR
1/2 cup COCONUT FLOUR
1/4 cup FLAX SEED MEAL
1 teaspoon BAKING SODA
1/2 teaspoon SALT
5 EGGS
2 teaspoons LEMON JUICE
2 tablespoons MAPLE SYRUP
3 tablespoons VEGAN BUTTER
(+1 tablespoon for topping), melted
1/2 teaspoon CINNAMON, ground
(+1/2 teaspoon for topping)

Directions

  • PREHEAT oven to 350 degrees F
  • PREPARE a 9X5 loaf pan with parchment paper
  • In a large bowl, COMBINE almond flour, coconut flour, flax seed meal, baking soda, salt, and cinnamon. Mix well.
  • In a medium bowl, WHISK eggs
  • MIX maple syrup into eggs
  • WHISK melted butter into egg mixture. Stir well.
  • COMBINE the egg mixture with the dry mixture. STIR well, making sure that there are no lumps in the batter.
  • POUR the batter into the prepared loaf pan. Pat down the loaf so that the top is level for a nice looking crust
  • BAKE for 30 to 35 minutes until golden brown
  • While bread is baking, PREPARE topping
    • In a small bowl, MELT 1 teaspoon of butter
    • MIX 1/2 teaspoon of ground cinnamon into the butter
  • REMOVE the loaf from the oven when a toothpick inserted in loaf comes out clean
  • LIFT the loaf by the parchment and place on a plate to cool
  • BRUSH topping mixture over loaf while hot
  • SERVE warm or room temperature
  • STORE in the refrigerator in foil for 4 to 5 days or freeze for 3 months

Inspired by CotterCrunch Cinnamon Almond Flour Bread

Dairy-Free Pan Roasted Swordfish with Garlic Spinach & Rosemary Red Potatoes

If you like flavor, this 30-minute easy to prepare gluten and dairy free restaurant-style dinner is my new go-to favorite. If you want to impress someone but don’t have much time, this is the perfect seafood dinner to do it with. The secret for the swordfish is my dairy-free seasoned compound butter which was inspired by Chef Dennis. Paired with garlic spinach and rosemary potatoes, you can’t get much more flavorful in 30 minutes. Let me know what you think.

Preparation time: 15 minutes

Cooking time: 15 minutes

Servings: 2

Ingredients

SWORDFISH
1 tablespoon EXTRA VIRGIN OLIVE OIL
2 6-ounce SWORDFISH fillets
Pinch SEA SALT
2 tablespoons VEGAN BUTTER, room temperature
1 1/2 teaspoons dried PARSLEY
1 clove GARLIC, minced
1/2 teaspoon GINGER, ground
1/8 teaspoon crushed RED PEPPER
1/4 teaspoon LEMON JUICE
POTATOES
4 cups RED POTATOES, cubed
1 tablespoon VEGAN BUTTER, melted
1 clove GARLIC, minced
1 teaspoon dried ROSEMARY
SALT & PEPPER to taste
SPINACH
1 10-ounce bag of SPINACH (4 cups fresh)
1 tablespoon EXTRA VIRGIN OLIVE OIL
1/2 teaspoon GARLIC SALT
Sprinkle of VEGAN PARMESAN CHEESE

Directions

  • PREPARE SWORDFISH
    • PREHEAT over to 400 degrees F
    • SEASON the swordfish with sea salt to taste
    • HEAT the oil in an ovenproof frying pan over medium-high heat
    • PLACE the swordfish in the frying pan and COOK for 3 minutes, until browned
    • FLIP the swordfish over and MOVE the frying pan to the oven
    • BAKE for 10 minutes until swordfish is done.
    • In a small bowl, prepare the compound butter by mashing the room temperature butter with the parsley, garlic, ginger, crushed red pepper, and the lemon juice until well blended. Set aside.
    • While fish is in the oven prepare the spinach and the potatoes
    • When fish is cooked, CAREFULLY REMOVE the frying pan from the oven (use oven mitt because the handle will be very hot) and RETURN to the stove on medium-high heat
    • ADD the compound butter to the frying pan and MELT until bubbling, SPOONING butter on top of fish to flavor both sides
    • SERVE swordfish on a plate and SPOON more butter on top
  • PREPARE SPINACH
    • HEAT oil in a frying pan or wok
    • ADD spinach and COVER tightly for 5 minutes to steam spinach
    • SPRINKLE garlic salt on spinach, COVER and continue to COOK for 5 more minutes, or until spinach has wilted to the desired level
    • SERVE with a SPRINKLE of vegan parmesan cheese, if desired
  • PREPARE POTATOES
    • In a medium (8-inch) microwave-safe baking dish, MELT the butter (1 minute at 50% power usually works for me, but microwaves vary)
    • MIX to combine the garlic and rosemary into the melted butter
    • ADD the potatoes and TOSS well with butter mixture
    • COVER and MICROWAVE for 8 minutes or until the potatoes are fork-tender (it really depends on how small you cut them)
  • SERVE swordfish, spinach, and potatoes together and enjoy

Red Pepper Panko Tilapia – Gluten-Free & Dairy-Free

The secret to this well seasoned gluten-free tilapia dish is browning the panko mixture before you bread the fillets. Tilapia is an inexpensive farm-raised white fish that is easy to cook, low in fat, and a good source of protein. Don’t overlook its nutritional benefits. This recipe gives it flavor and pizzaz. Let me know how yours turns out.

Preparation time: 10 minutes

Cooking time: 15 minutes

Servings: 4

Ingredients

1 cup gluten-free PANKO BREAD CRUMBS
3 tablespoons EXTRA VIRGIN OLIVE OIL
4 TILAPIA FILLETs, about 6 ounces each
1/4 teaspoon ROASTED GARLIC POWDER
1/2 teaspoon GINGER, ground
1/2 teaspoon PAPRIKA
1/2 teaspoon crushed RED PEPPER FLAKES
KOSHER SALT, to taste
BLACK PEPPER, to taste
Serving suggestion: LEMON wedge

Directions

  • PREHEAT oven to 425 degrees F
  • PREPARE BREADING
    • In a medium flat bottomed bowl (because you will be using it to bread the fillets), COMBINE panko crumbs, garlic powder, ginger, paprika, and red pepper flakes with 1 tablespoon of olive oil. MIX well.
    • SPREAD panko mixture on a baking sheet and BAKE for 5 minutes, until lightly browned.
    • RETURN to bowl
  • SEASON fillets with salt and pepper, to your taste
  • PRESS each fillet into the prepared panko mixture, coating both sides thoroughly. (And I mean really PRESS with your hands so it sticks well.)
  • PLACE the fillets on the baking sheet that you used to brown the panko mixture.
  • DRIZZLE the remaining 2 tablespoons of oil over the fillets
  • BAKE for 15 minutes
  • SERVE warm, with a wedge of lemon
  • STORE in an airtight container in the refrigerator for 1-2 days

Inspired by Food and Wine’s Crispy Baked Tilapia

Roasted Maple Acorn Squash Delight

If winter had a taste, this quick, easy, and delicious side dish would be it. Who can resist maple syrup, brown sugar, and spices? Don’t be afraid of the acorn squash’s rugged exterior. With a sharp knife and a cutting board, you will master this veggie in no time. Leave the skin on, it’s soft and edible when roasted.

Preparation time: 10 minutes

Cooking time: 30 minutes

Servings: 4

Ingredients

2 ACORN SQUASH, cut in 1-inch slices
2 tablespoons VEGAN BUTTER, melted
1 tablespoon OLIVE OIL
1/4 cup pure MAPLE SYRUP
1/4 teaspoon CINNAMON, ground
1/8 teaspoon CLOVES, ground
1/2 teaspoon KOSHER SALT
1 tablespoons BROWN SUGAR, more to taste

DIRECTIONS

  • PREHEAT oven to 400 degrees F
  • WASH squash and pat dry
  • With a sharp knife, SLICE 1/4 inch off the stem and base ends of the squash
  • SET the squash down on the flat sliced stem end and CUT the squash in half from top to bottom
  • Using a large spoon, REMOVE the seeds and pulp from each half and discard/compost.
  • Lay each piece on its flat side and CUT 1-inch slices
  • In a medium-size microwave-safe bowl, COMBINE the butter, maple syrup, oil, cinnamon, salt and cloves and heat for 30-45 seconds, until the butter melts. STIR well.
  • On a rimmed baking sheet, ARRANGE the slices in a single layer.
  • BRUSH the maple mixture over all the slices
  • TURN the slices with a fork and BRUSH the other side
  • SPRINKLE brown sugar on each slice
  • BAKE for 15 minutes and then flip each slice and bake another 15 minutes. You know they are done when they are well carmelized and tender.
  • SERVE warm
  • STORE in an air-tight container in the refrigerator for 2-3 days

Paleo Banana Bread Muffins – Gluten-Free & Dairy Free

This is my first known attempt at a PALEO treat and they taste amazing. I created these muffins with almond butter, almond flour, bananas, and eggs. They are dense like banana bread but easier to eat in muffin form. They are dairy-free, grain-free, and if you don’t use the paleo chocolate chips, they contain no extra sugar and are soy-free too. We have been eating them with dairy-free cream cheese for breakfast all week.

Preparation time: 10 minutes

Cook time: 19 minutes

Servings: 18 muffins

Ingredients

 
3 large EGGS, room temperature
1/2 cup natural ALMOND BUTTER
1/2 teaspoon VANILLA EXTRACT
4 ripe BANANAS, mashed (about 1-1/2 cups)*
1 cup ALMOND FLOUR
1 teaspoon corn-free BAKING POWDER
1 teaspoon BAKING SODA
1 teaspoon CINNAMON, ground
1/4 teaspoon ALLSPICE
1/2 teaspoon NUTMEG, ground
1/4 teaspon SALT
1/3 cup WALNUTS, chopped plus some for topping
Optional: 1/4 cup Paleo dairy-free MINI CHOCOLATE CHIPS** plus
some for topping

*I freeze over-ripe bananas often (why waste them?). They
work great for mixes like this. They thaw quickly and
mash easily.
** Without the chocolate chips these muffins
will also be soy-free

Directions

  • PREHEAT the oven to 375 degrees. (This is 25 degrees warmer than we are going to bake them at, but the extra heat to start helps the muffins brown on top when cooked.)
  • LINE 18 muffin cups with paper liners (I use 2 12-cup muffin trays because that is what I have.)
  • In a medium bowl, MASH bananas until smooth.
  • In a large bowl, BEAT the eggs and then ADD almond butter and vanilla. WHISK them all together well.
  • ADD mashed banana puree to the wet mixture
  • DUMP in almond flour, baking soda, baking powder, and spices. Gently MIX dry ingredients with wet mash mixture until there are no lumps. The batter should be a medium consistency. Don’t use an electric mixer because over beating the batter will cause the muffins not to rise. Just mix until you don’t see any more flour.
  • FOLD in walnuts and chocolate chips (if using).
  • Using a soup ladle, FILL each muffin lined cup 2/3 full
  • Optionally, TOP 1/2 the muffin cups with some extra chopped nuts and 1/2 with extra chocolate chips
  • LOWER the oven temperature to 350 degrees
  • BAKE the muffins for 14-19 minutes. Check them at 14 minutes. You know they are done when a toothpick inserted in the center comes out clean (unless it hits a chocolate chip, then use another toothpick and try again).
  • COOL the muffins in the pan for 5 minutes then transfer to cooling racks. Cool completely.
  • STORE in an airtight container for 2-3 days or FREEZE in an airtight container for 3 months.

TO MAKE A LOAF INSTEAD OF MUFFINS: If you want to try this as a bread instead of muffins, then mix all ingredients as above, but use a loaf pan instead of a muffin tray. LINE the loaf pan with parchment paper. FILL the loaf pan with the batter. TOP with chopped nuts. REDUCE oven temperature to 350 and BAKE for 50-60 minutes (using the toothpick method above to test for doneness). COOL completely in the loaf pan. LIFT out the bread using the parchment paper and slice.

Breakfast muffin with diary-free cream cheese and scrambled eggs with vegan ham

Cocktail Sauce

Once you find out how quick and tasty this cocktail sauce is, you may wonder why you ever bought it in a bottle from the store. I pair it with my ‘Maryland My Maryland’ Crab Cakes or chilled shrimp for yummy appetizers.

Total time: 5 minutes

Servings: 1 cup

Ingredients

1 cup KETCHUP
1/2 tablespoon LEMON JUICE
1 teaspoon HORSERADISH (more to taste)
1 teaspoon WORCESTERSHIRE SAUCE

Directions

  • In a small bowl, MIX all ingredients well
  • Refrigerate until ready to use.

Thanks to my friend, Linda Engle, for her recipe

My Maryland Crabcakes – Gluten-Free & Dairy-Free – Fried or Broiled

Living in Maryland makes me a blue crab snob, for sure. Trying to get Gluten Free Crabcakes anywhere but in my own kitchen, is close to impossible. Most people use bread crumbs for filler, so I created a gluten-free and dairy-free crabcake with just the right amount of Old Bay seasoning that is both moist and flaky. As a condiment, I make my own cocktail sauce, which far surpasses anything in a bottle. My family loves crab and even the non-gluten-free people are in love with these cakes, Note that this recipe for 4 only fed 2 for dinner at my house. Some options to extend it might be to double the recipe (but right now lump crab is $70 a pound), make them smaller and use them as an appetizer, or extend them with a pound of claw crab meat. I updated this recipe in June 2021 to add a broil option for those that like it that way as well as changed around the order of mixing, because it works better.

Preparation time: 10 minutes + (minumum)1 hour in refrigerator

Cooking time: 8-10 minutes per cake

Servings: 4 (8 cakes)

Ingredients

1 pound fresh LUMP CRAB (Maryland jumbo lump or backfin)
1/4 cup MAYONNAISE
1-1/2 teaspoon DIJON MUSTARD
1-1/2 teaspoon OLD BAY seasoning (or more to taste)
1 teaspoon WORCESTERSHIRE sauce
1 teaspoon LEMON JUICE
1/4 teaspoon KOSHER SALT
1/4 to 1/2 cup Italian style gluten-free BREAD CRUMBS (start with 1/4)
1 teaspoon PARSLEY
1 EGG, lightly beaten
1/2 cup VEGAN BUTTER

Directions

  • DRAIN crab, if necessary, and PICK through for shells. The good-quality jumbo lump should not have shells. Place cleaned crab meat in a bowl and set aside.
  • In a large bowl, WHISK together mayonnaise, mustard, Old Bay, Worcestershire sauce, lemon juice, and salt.
  • FOLD in the crab meat gently, trying not to separate the lumps. Combine well.
  • SPRINKLE the parsley and breadcrumbs over the crab mixture and mix gently but fully, once again trying not to break the lumps. Be careful not to mash them too much, you want the lumps to be whole.
  • In a small bowl, BEAT the egg lightly and pour over the crab/breadcrumb mixture folding gently with your hands. (Don’t over mix.)
  • COVER the bowl with plastic wrap and refrigerate for at least 1 hour. (I put them in the refrigerator usually a few hours before cooking.)
  • When ready to cook, take the bowl out of the refrigerator and with clean damp hands, FORM the chilled crab mixture into 8* cakes, about 3-inches wide by 1-inch thick (kind of like flat baseballs). Place the formed cakes on a clean plate.
    • Or make 12 2-inches wide by 1-inch thick cakes and serve as an appetizer
  • TO FRY
    • HEAT a large skillet on medium-high heat. ADD butter and heat for about 2 minutes until the butter becomes frothy.
    • ADD the cakes to the pan. (8 1-inch cakes should all fit into a 12-inch skillet.)
    • FRY the crab cake on medium-high for about 4 minutes until golden brown then FLIP the cake and reduce heat to medium-low for another 4 minutes, until the other side is golden.
    • SERVE cakes immediately with cocktail sauce (or tartar if you prefer).
  • TO BROIL
    • PRE-HEAT the broiler in your oven.
    • PLACE the formed cakes on a parchment paper-lined backing sheet.
    • Slightly SPRINKLE them with Old Bay seasoning.
    • BROIL the cakes for 10 minutes or until golden brown.
  • STORE leftovers in the refrigerator in an airtight container for 2 days.

Inspired by Classic Maryland Crab Cakes Recipe by Susie Middleton, Fine Cooking Issue 99